You can add database to the dataPro databases tree window by clicking on the Add push button or by selecting menu item "Add" from Database popup menu.
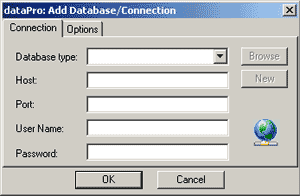
Connecting to MySQL database
1. Select MySQL as a Database Type
2. Enter host name or IP address for the computer hosting MySQL databases.
3. Port field will display standart MySQL port. If your database uses different port for client connections you should enter your port number here.
If you don't know the port number or you are not sure leave port number unchanged.
4. Enter User Name
5. Enter User Password
6. Use Options tab to customize the connection properties
7. Click OK
An Add Database Dialog Box will disappear and if the connection was established you will see a new host icon under the database type, otherwise, you will get an error message explaining why the application was not able to connect.
Connecting to PostgreSQL database
1. Select PostgreSQL as a Database Type
2. Enter host name or IP address for the computer hosting PostgreSQL databases.
3. Port field will display standart PostgreSQL port. If your database uses different port for client connections you should enter your port number here.
If you don't know the port number or you are not sure leave port number unchanged.
4. Enter User Name
5. Enter User Password
6. Use Options tab to customize the connection properties
7. Click OK
Connecting to SQL Server database
1. Select SQLServer as a Database Type
2. Enter the name for the computer hosting SQL Server databases. (For example "MyServer").
- For local SQL Server database enter [local].
- If you want to connect to a "Named Instance" (SQL Server 2000), you must to specify [Servere Name\Instance].
3. Use Options tab to select network protocol or customize the connection properties
4. Enter port number if different from standart SQL Server port. Otherwise or if unsure leave this field unchanged.
5. Enter User Name (Leave empty to use Windows authentication).
6. Enter User Password (Leave empty to use Windows authentication).
7. Click OK
Connecting to Oracle database
1. Select Oracle as a Database Type
2. For the Host field you can use a short or full description of the Oracle database you want to connect to.
- If you have set up ora.ini file on your computer, you may enter Oracle service name.
- If you did not have ora.ini set up, or you are not sure, you may use long form in the format of [IP]:[SERVICE_NAME]:[PORT]. For example: 192.168.0.91:ORCL:2213.
- If you are using standard Oracle port you can omit port and enter just server IP address and service name, for example 192.168.0.12:MYORCL.
3. Use Options tab to select network protocol or customize the connection properties
4. Enter port number if different from standart Oracle port (If you have entered port number in the Host field this field will be ignored). Otherwise, or if unsure, leave this field unchanged.
5. Enter User Name
6. Enter User Password
7. Click OK
Connecting to SQLite 3 database
1. Select SQLite as a Database Type
2. Enter full path to the SQLite database file in the Host field. (For example "c:\mydirectory\test.db"). You can click Browse button to browse for the SQLite file on the local computer
or you can create a new SQLite database file by clicking New button.
Connecting to Microsoft® Access database
1. Select Microsoft® Access as a Database Type
2. Enter full path to the Microsoft® Access database file in the Host field. (For example "c:\mydirectory\test.mdb"). You can click Browse button to browse for the Access file on the local computer
or you can create a new Microsoft Access database file by clicking New button.
The rest of the fields are optional. If the database has a user name and a password associated with it, enter the user name and password.